• Welcome to Ecoboost Performance Forum. Please log in or sign up.
collapse

Rx Catch Can Install on Explorer Sport

Started by JimiJak, April 06, 2014, 09:49:25 AM

Previous topic - Next topic

Tuner Boost

Be aware, we are seeing more EB's filling the crankcase with fuel, and in almost every case this has been a failing seal on the HPDI pump (high pressure DI pump) so if your catching long term that same amount of fuel more than water and oil (let it settle a few days. Water will be on the bottom of the container, sulfuric acid next, then fuel and oil emulsified, then oil on the top layer (4 distinct layers will appear).  If your still getting more fuel than other stuff, then have the dealer check for it being the pump.

We have had several truck owners that after installing the RX system the dealers were able to determine the source of the fuel ingestion and fix the issue. One after 15 visits to the service department!

That mod is perfect JimiJak.  And as far as the "off road" breather ($69 form Ecoboost Power Parts) as long as there is NO MAF sensor, and only the IAC sensor shown anywhere in the pipe between the air box and the throttle body, an "off road only" non emissions compliant breather should work fine for those not minding vapors smelling in the engine compartment.

But I really like this solution better than any yet how JimiJak did this.


glock-coma

" VTA mod "should" just be venting "clean" pressurized air."

I have noticed that I do have a light oil mist that comes from the bov, especially on the fire wall side.
The hoses and tubing  have a light coating of oil on them.

2010 RCM non PP
K&N panel filter
sp534 @ 30
unleashed 93 performance+boost
more to come.....

2010 red candy metallic non PP 402B
AJPTURBO 2 BAR Tune Stock 14.1@100.3 / Tuned 12.83@107.7
K&N panel, RX OCC, Sp-534 @.30 Tint 50%F-35%R BOV bypass
1997 SHO silver frost (sold)
1990 SHO triple black 5-speed (saved my life)

JimiJak

Rx catchcan – Re-Location with Remote Drain
- It stays cooler, tucks out of the way, sits, lower, drains easier, and looks (almost) stock from above!!

...let's find out how:
Materials you will need -
x3 - pneumatic fittings - threaded hose barbs (metal) 1/4" NPT-Male / 3/8" hose barb
x1 - pneumatic fitting - connector (metal) 1/4" NPT-Double Female
x1 - 3/8" 90* Elbow
xSeveral feet of 3/8" PCV / Fuel Hose (most of which can be reclaimed and/or extended with butt connectors from original install if you rather)


After removing the front end, I started digging around...I quickly realized my initial plan to mount it F-150 style, in front of the radiator, was simply not going to happen. Which honestly, I was fine with, since I'm not big on robbing any air flow from the radiator or CAC. BUT THERE'S GOOD NEWS!! Although I have no idea what lies behind the SHO fenders (sorry guys) the XSport has LOADS of room in front of the wheel wells and behind the front bumper. Originally, I wanted to stay nearest the PCV as I could...and that would be the passenger's side. However, with the washer fluid reservoir occupying part of my real-estate, I started examining my driver's side options.

After removing the catch can from it's previously mounted home, I dismantled the mounting bracket, and started test-fitting my alternatives. Similarly to the top-side mounting endeavor, I found a vacant mounting tab, again with the perfect size mounting hole already drilled in it. Using only the provided mounting bracket, I was able to align the can perfectly upright, and at the correct height.

I took avid mental notes prior to moving the bumper regarding clearance and access issues from underneath. The original ford plans must have had an Rx can drawn up and removed at the last second because yet again there was a perfect drain hose/valve option to be had. I am terribly happy with the new layout, and while you can get the gist of things from the pic below, I'll explain how it all worked out...ENJOY!


First off; while test-fitting the engine cover after the original mounting, it made a bit of a rub on the can...resulting in a bit of a peel-off-scar down the side of the can. I'll consider re-painting / powder coating later. So for now, please forgive the greasy fingerprints and franken-can. ;)


Step 1: Prior to mounting the can in front of the wheel, remove the valve from the bottom of the can


While you have it in your hand; this is the perfect time to rebuild the valve and can. I used some teflon pipe tape...may not be necessary, but it made me feel better.
Take one of the threaded hose barbs and thread it in to the bottom of the catch can.
For rebuilding the valve:
Attach one of the threaded hose barbs to (what will be) the bottom of the valve .
Attach the double female connector to the top of the valve, and the last threaded hose barb to the top of it.


Tighten with a wrench:


Now you can mount your catch can. You should find an existing mounting tab with a pre-drilled hole. You can manipulate your bracket as such and mount the bracket as low on the can as possible. Use the upper two holes on the can, and slide the can as low as possible within the bracket. As you can see, you're doing this for the purpose of hose-alignment.


You will be feeding the hoses through either from can, or engine side (either way). If you look from the outside, you can see a visible channel that runs underneath the stock air box, and above the frame. You will run one line at a time underneath the airbox.


Once they have been run through the channel, they will turn upwards, and follow the intake pipes / charge pipes to the rear of the engine. If you already have the hole drilled / tapped in the front intake pipe, you can leave it as is. If you're installing for the first time, there is no need to drill the front pipe as you can attach the hose to the vacant vacuum barb on the intake pipe (shown here as "capped off"). Also, regarding the rear intake pipe: If you are installing for the first time, I recommend installing a 90* elbow in the hose, after attaching hose to the fitting that's been tapped into the rear pipe. This takes the pressure off the fitting, and makes for a cleaner install than just bending the pipe. If you're already installed (like I was), it's just as simple to cut the hose and install the elbow.
So, you now have three lines, all running together from the catch can.
Outside fitting #1 - Runs to the front intake pipe fitting or vacuum barb, and rear intake pipe fitting. This is a source of vacuum for the can.
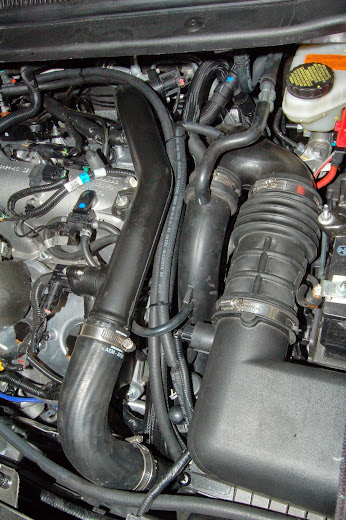

Outside fitting #2 - Runs to the vacuum barb on the Intake Manifold.
Center elbow fitting - Runs to the PCV vacuum barb located on the rear valve cover.
Both are visible in this picture. Also, I found that it gave me a much better angle off the IM vacuum barb to replace this connector with the 120* connector that was left over from the CSS install, rather than the 90* connector that was originally there. This allowed me to run my line directly back towards the PCV and zip tie them together.


As for the remote drain:
attach a length of your 3/8" hose to the bottom of the catch can.
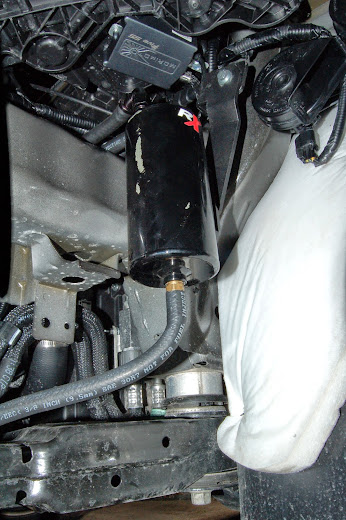

You should now be able to locate the frame extension as indicated below. Towards the front of the frame extension there is a 1/2" hole that already exists, and runs straight through to the bottom of the frame extension. You will run your hose through this hole.
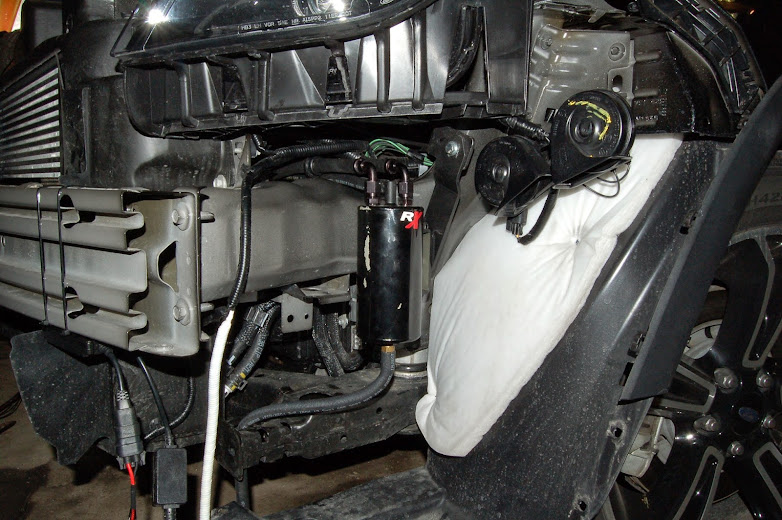

Now, here is where the choice of hardware used to rebuild the valve becomes important. On the top side of the valve, you could have used a threaded female to hose barb connector, rather than the coupling like I indicated...this would have saved you some space. But, for this particular mounting, I found it to be easier to manipulate the valve when it was spaced away from the frame extension. The coupling is large enough that it does not fit through the hole, so with the addition of a zip-tie, makes for a VERY sturdy and easily accessible mounting location. I added the probably unnecessary 3/8" rubber nipple just to keep any crud out of the lower hose barb. As you can see, there's plenty of room that leaves it still quite tucked away behind the skirt.


Congratulations! You have now successfully completed the install!...or re-route!...either way congrats.
This is what you should see under your hood.


With the can now re-routed completely out of the engine bay, your engine cover should fit back on without a problem. Since all of your hoses are tucked down neatly between the charge pipe and intake pipe.
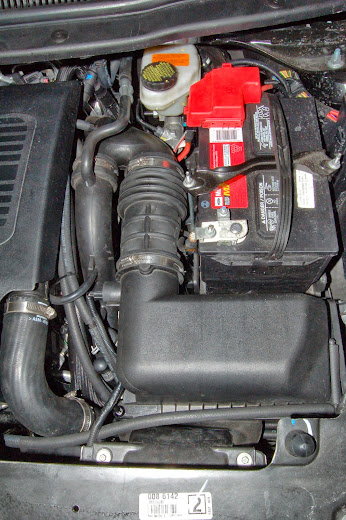

Looks almost stock if not for the CSS.


Why, other than a cleaner looking install did we do this?
Well, the main benefit is to mount it somewhere outside of the engine compartment where it will remain cooler, thus enhancing the condensation /collection effects of the can.

As usual...with any questions / comments / concerns...please don't hesitate to ask!
"America is all about speed. Hot, nasty, badass speed." - Eleanor Roosevelt

2014 XSport Black Betty Build

ShoBoat

Looks good! Man that is a ton of work, thanks for the write up.
2012 Pearl White CTS-V Stock
2016 Fusion Titanium 2.0 EB Stock
2013 SHO Black on Black (Gone) PP, Unleashed Custom Tune, 170 TStat, SP534 Plugs, 3 Bar, Airaid Intake, PPE catted downpipes, Corsa Cat-back, H&R Springs. Focal 165KR Front Stage,2 JL W6 10 with Focal 800.1. 12.62 @ 110 mph.

JimiJak

It really wasn't that bad. If you were to install the system this way originally, rather than having to re-route it, the only extra time would be to remove the bumper...which took about a half hour.

All together, to completely re-route the system, with test fitting and experimentation accounted for, stopping to take pictures, a very unnecessary half hour spent trying to fish out an elbow I dropped (I just couldn't let it win), plus including the installation of HID fog lights while I had the bumper off, and a run to the hardware store for fittings and elbows... I would say I still spent less than 5 hours from start to finish.
"America is all about speed. Hot, nasty, badass speed." - Eleanor Roosevelt

2014 XSport Black Betty Build

Tuner Boost

Awesome!!!!   Your hired.  Excellent. This will make this tons easier.

QuickSilver

Hey Jimi, you're not gonna be in SoCal anytime soon are ya? ;D  Meh, didnt think so. I've been working on other project cars and the DD Esport has been last on the list. Just gotta dig into it using your install pics and tips.

By any chance did you notice while you had the front end off if there was a plastic 'guard' blocking airflow to the intercooler? Im still not certain if that piece rumored to 'increase IC temps' in an effort to cure the moisture injestion really exists?  If I find it there durning the catch can install it will certainly be coming off...
AJ

2014 Ingot Silver Explorer Sport- LMS V3 Tune, AirRaid CAI, Hi_flow Catted DP's to Complete dual 2.5" exhaust, 19"X 9.5"TSW Panorama Rotary Forged/powdercoated Rims, Cree LED Foglights, Hoping for those Megan coilovers to be developed...

JimiJak

Quote from: QuickSilver on April 23, 2014, 12:24:38 AM
By any chance did you notice while you had the front end off if there was a plastic 'guard' blocking airflow to the intercooler? Im still not certain if that piece rumored to 'increase IC temps' in an effort to cure the moisture injestion really exists?  If I find it there during the catch can install it will certainly be coming off...

First I'm hearing of this one...so I can't say I was really looking for it...I didn't notice anything really stand out as "why is that there?". Just saw an interior bumper assembly, air dams to keep pressure on the CAC and RAD, and the back side of a grill that made me consider getting out my dremel.
...seriously, the thing's got a HUGE grill on it, and it's only actually open for these two small strips down the middle. I'm sure there has to be a reason why they don't want a massive amount of air flowing through the coolers, but I can't fathom why. Even the mesh patterned grill (without bars) that was found on some interceptor somewhere, had a ridiculous amount of backing behind it...completely defeating the purpose. (rant over (for now)) You'll have to let us know what you find!

I was under there this afternoon tweaking the HID fogs and cleaning up some wire-clutter, and I got to thinking...since we have so much room in front of that wheel...I wonder if a "Monster Can" would fit now? Pretty sure the only reason Tracy recommended against it was due to fitment issues...
"America is all about speed. Hot, nasty, badass speed." - Eleanor Roosevelt

2014 XSport Black Betty Build

JimiJak

Just a quick update on a couple things:
First the Teflon pipe tape on the valve fittings is not optional. Ended up with a small leak from not having enough tape. Make sure to wrap each fitting 3-4x.

Also, I had the cover off my airbox today. The k&n panel filter, air box, and the inside of all fittings are still home dry. No oil or residue anywhere after moving the CSS line.

That is all... :D
"America is all about speed. Hot, nasty, badass speed." - Eleanor Roosevelt

2014 XSport Black Betty Build

Tuner Boost

Quote from: JimiJak on April 23, 2014, 12:33:42 AM
Quote from: QuickSilver on April 23, 2014, 12:24:38 AM
By any chance did you notice while you had the front end off if there was a plastic 'guard' blocking airflow to the intercooler? Im still not certain if that piece rumored to 'increase IC temps' in an effort to cure the moisture injestion really exists?  If I find it there during the catch can install it will certainly be coming off...

First I'm hearing of this one...so I can't say I was really looking for it...I didn't notice anything really stand out as "why is that there?". Just saw an interior bumper assembly, air dams to keep pressure on the CAC and RAD, and the back side of a grill that made me consider getting out my dremel.
...seriously, the thing's got a HUGE grill on it, and it's only actually open for these two small strips down the middle. I'm sure there has to be a reason why they don't want a massive amount of air flowing through the coolers, but I can't fathom why. Even the mesh patterned grill (without bars) that was found on some interceptor somewhere, had a ridiculous amount of backing behind it...completely defeating the purpose. (rant over (for now)) You'll have to let us know what you find!

I was under there this afternoon tweaking the HID fogs and cleaning up some wire-clutter, and I got to thinking...since we have so much room in front of that wheel...I wonder if a "Monster Can" would fit now? Pretty sure the only reason Tracy recommended against it was due to fitment issues...

Correct!!  The Monster is the best period, but fitment is difficult, so if you can fit it, do it!

JimiJak

Quote from: Tuner Boost on April 29, 2014, 01:30:36 PM
Correct!!  The Monster is the best period, but fitment is difficult, so if you can fit it, do it!

That sounds like a Challenge Tracy! I might just take you up on that. ;D

On to the draining!
Another 500mi drain complete 2,600 - 3,100mi.
Due to relocating the can along with a small leak due to not enough teflon pipe taps on the threads, the can got emptied a couple times between 2,200 and 2,600.
Driving style has been almost all girlfriend driving to and from work. Country roads (55-65mph) and Highway (70-80mph), 35-45min drive, pretty tame. Some of it was around town, but not much.
Also, I say "12oz. pop bottle" in the video...not sure what I was thinking...it is a 20oz bottle. whoops.

Rx OCC Drain @ 500mi Part II

...never mind my garage remodeling project. lol
I would say about 4-5x more in this go 'round. I still think it can be more efficient though. You can see the separation already at about the halfway point. So, my guess would be the amount of oil and sludge is about 2-2.5x more than the first drain, and the amount of water is also 2-2.5x more due to increased condensation effect of the can now being somewhere cooler.
Smells like oil. Not like gas. (whew)

The next steps I'm kicking around are using a filter rather than the airbox for the css and seeing if that has any impact. Since the air filter is bone dry, I'm not super worried about saturating the filter. Maybe leave the hose attached and just put a breather filter on the end of it.
Also, re-locating the return line on the intake pipes to the eBOV return bungs on the intake pipes. They're a lot closer to the turbos, plus no drilling. I just have to reduce it from 1" down to 3/8". Ideas for the most efficient barbs are welcome!

"America is all about speed. Hot, nasty, badass speed." - Eleanor Roosevelt

2014 XSport Black Betty Build

JimiJak

On another note, for anyone wanting to attach their CSS to the airbox...that doesn't have an airbox; ie. cold air intake:
Below are some pics of an EGR re-route I did on a Mazda6 that are applicable to your situation.

I wanted to intake fresh air instead of exhaust gasses through my EGR so I drilled a hole in the top of my CAI filter (Ingen, the top cap ended up being 1/2" rubber.


It held a 90* elbow in VERY clean and secure).


Then just used a series of 3/8" hose and elbows to get back up to the EGR.


Different system, but same principle.

"America is all about speed. Hot, nasty, badass speed." - Eleanor Roosevelt

2014 XSport Black Betty Build

ShoBoat

Just out of curiosity, can we not just vent the clean side to atmosphere? That way there would be no vacuum at all? Just put a air filter on the end of the hose from the clean side separator.
2012 Pearl White CTS-V Stock
2016 Fusion Titanium 2.0 EB Stock
2013 SHO Black on Black (Gone) PP, Unleashed Custom Tune, 170 TStat, SP534 Plugs, 3 Bar, Airaid Intake, PPE catted downpipes, Corsa Cat-back, H&R Springs. Focal 165KR Front Stage,2 JL W6 10 with Focal 800.1. 12.62 @ 110 mph.

SHOdded

Nice video, JimiJak.  Great news that fuel seems to be a minor component this go-round, a little worrisome though that so much oil (?) is floating as vapor in the system.  If you let the contents settle for a bit, maybe it will be just a small layer of oil crud?  Any noticeable change in dipstick reading?
2007 Ford Edge SEL, Powerstop F/R Brake Kit, TXT LED 6000K Lo & Hi Beams, W16W LED Reverse Bulbs, 3BSpec 2.5w Map Lights, 5W Cree rear dome lights, 5W Cree cargo light, DTBL LED Taillights

If tuned:  Take note of the strategy code as you return to stock (including 3 bar MAP to 2 bar MAP) -> take car in & get it serviced -> check strategy code when you get car back -> have tuner update your tune if the strategy code has changed -> reload tune -> ENJOY!

JimiJak

Nope, oil level has stayed consistently full. I plan to let it settle for a couple days, then I'll get a nice clean pic of it posted.
"America is all about speed. Hot, nasty, badass speed." - Eleanor Roosevelt

2014 XSport Black Betty Build