• Welcome to Ecoboost Performance Forum. Please log in or sign up.
collapse

My Modded C3 Corvette

Started by BlackJac, January 27, 2015, 09:08:30 PM

Previous topic - Next topic

BlackJac

The stock 69' vette sidepipes were choking the engine. The Hedman headers had 1 5/8" primaries going into 3" collectors, down into a 2 1/4" connecting pipe, and through a 2" baffle. I found a buyer for my old exhaust system and moved up to a Hooker Stainless steel sidepipe system. The primaries are 1 7/8" into 4" collectors, with 4" sidetube, and 2 1/2" Hooker Max Flow baffles. These are the best sounding, high performance baffles that produce a deep low tone. No more restriction on the exhaust.

Here's a few pictures.


2.5" Muffler/ Baffle


Here's a video I took. Sorry, I had the camera on the wrong settings, so it came out jumpy and slowed. But the sound is real good! Camera mounted inside with the windows up.

https://www.youtube.com/watch?v=XKaNKhs59NQ


2017 Fusion Sport - 401A/ Moonroof/ Magnetic Grey/ Livernois Motorsports 93 Stage 3

2015 Explorer Sport  - SOLD

Modded 1980 Corvette https://www.youtube.com/watch?v=4SUDndpy8bw

IHeartGroceries

Wow, that's alot of work and alot of hours. And the result is fantastic. Great stuff!
2013 SHO PP

BlackJac

Thanks!

Yeah, it's a blast to drive. I had an older guy in a SL Mercedes vert, not sure the exact model, nose kinda slanted forward, anyhow he tried taking me. I gave him about 2 car lengths start when I was going easy in second gear before I hit. By the end of second I was next to him, and in third I was putting distance on him. I let off before hitting fourth. When he passed me he was giving me 2 thumbs up. lol

Here's a couple more videos I posted in the past.

https://www.youtube.com/watch?v=4SUDndpy8bw

https://www.youtube.com/watch?v=wBJIHEVxDyw
2017 Fusion Sport - 401A/ Moonroof/ Magnetic Grey/ Livernois Motorsports 93 Stage 3

2015 Explorer Sport  - SOLD

Modded 1980 Corvette https://www.youtube.com/watch?v=4SUDndpy8bw

BlackJac

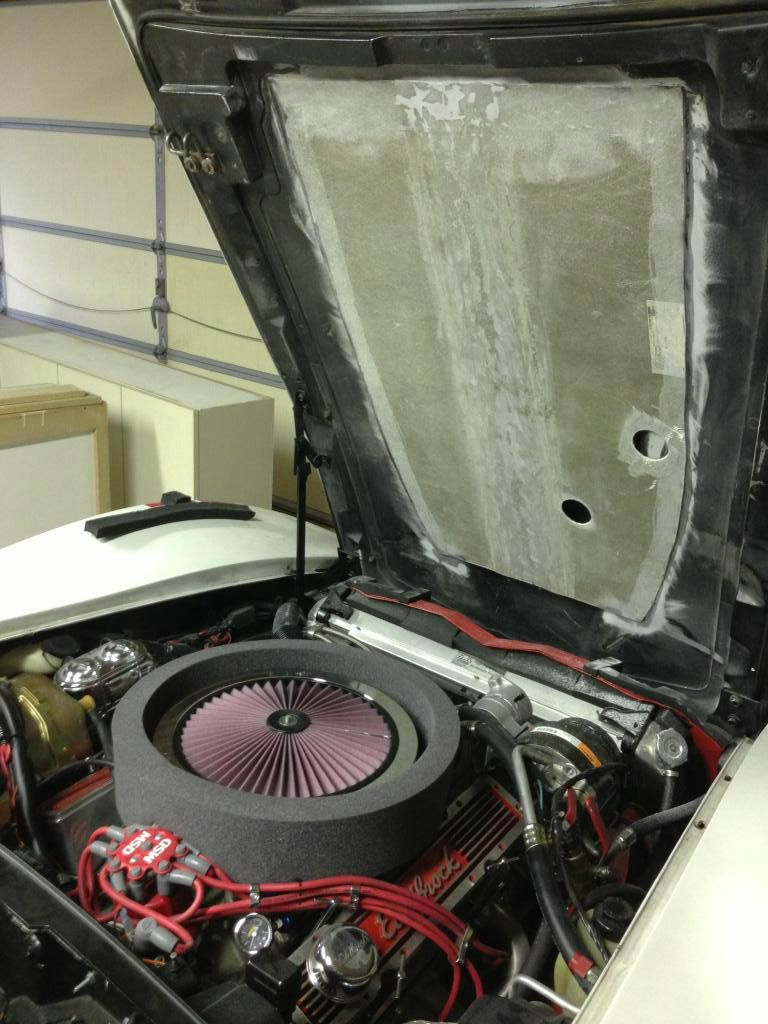
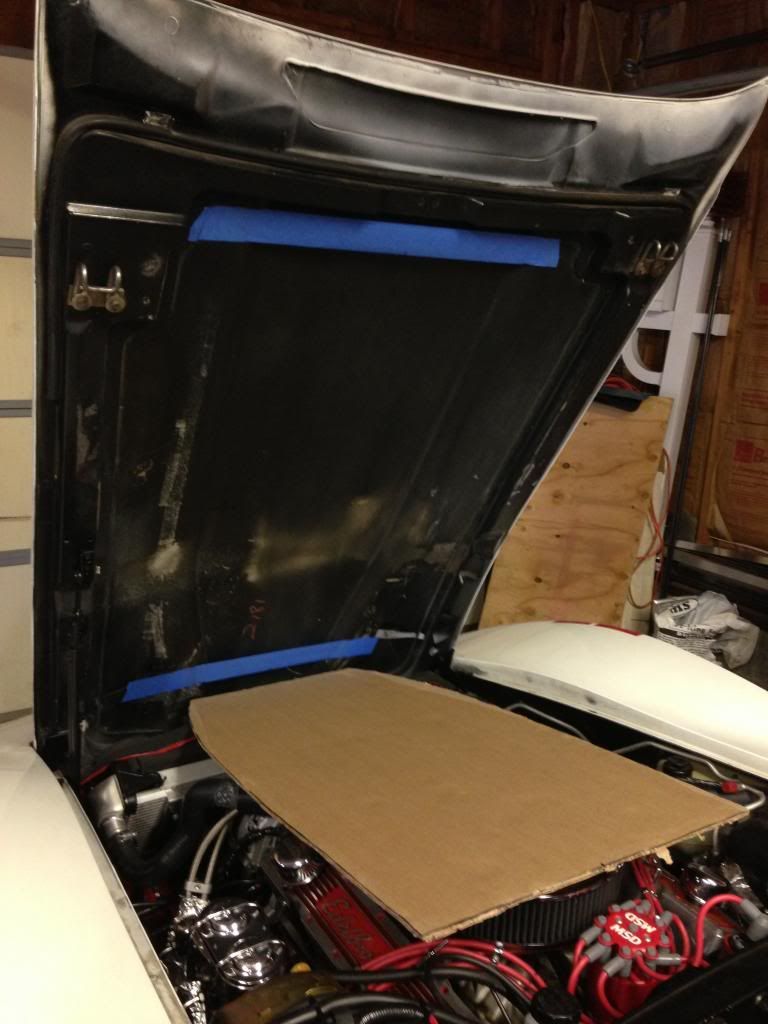
I got this idea about building my own cold air induction. Most of the air for cooling comes up through the airdam which is a large opening between the lower front spoiler and the chin of the front bumper, and there is also a couple of vents next to each front parking lamp in the front. The air that doesn't go through the radiator, travels above in between the top of the radiator support and the inside of the hood. So i decided to make an insulated air chamber on the inside of the hood and provide a direct sealed path for the air coming up the air dam, over the rad. support, through the air chamber, and into the air cleaner/ carburetor. Here's how I did it.

I marked off my stock 80' hood and made a cardboard template.


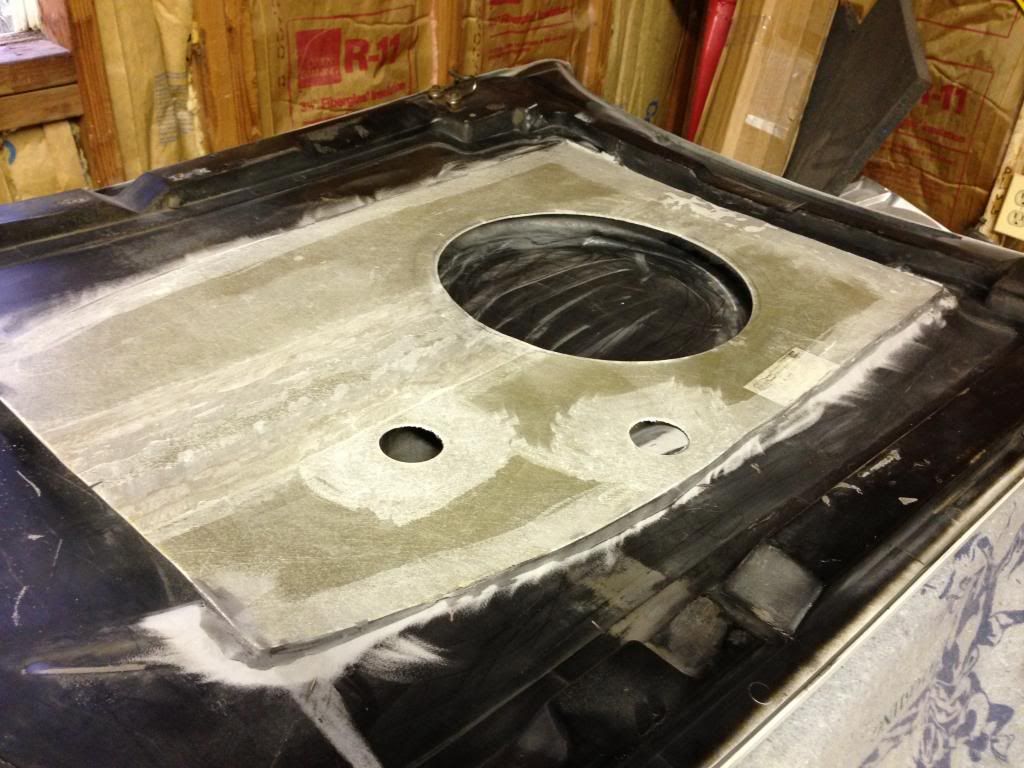
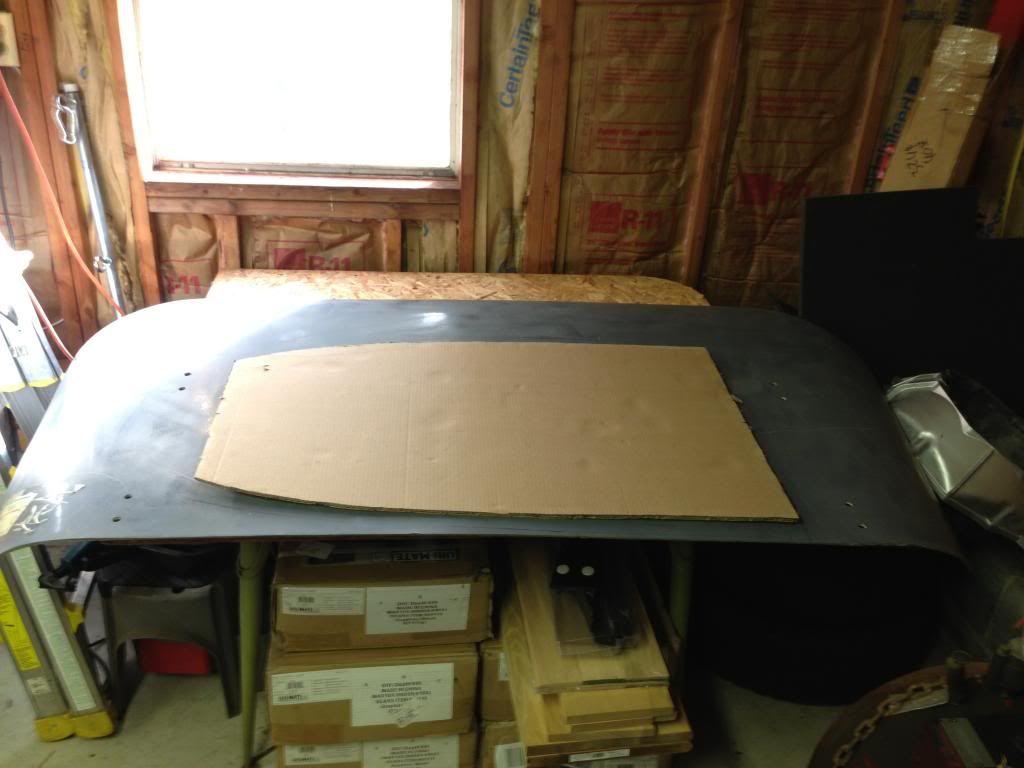
Next I used the template to cut out the piece I need out of a fiberglass panel. The panel is a roof wind deflector from a tractor trail, new/ unused that work was throwing out, so it didn't cost me anything.


I removed the hood and prepped it for attaching the fiberglass panel.


I used Norton's Speedgrip Adhesive to attach the panel to the hood. I already had the applicator gun, so the adhesive was about $35.


I now have the air chamber done. The front will seal against the radiator support when closed.


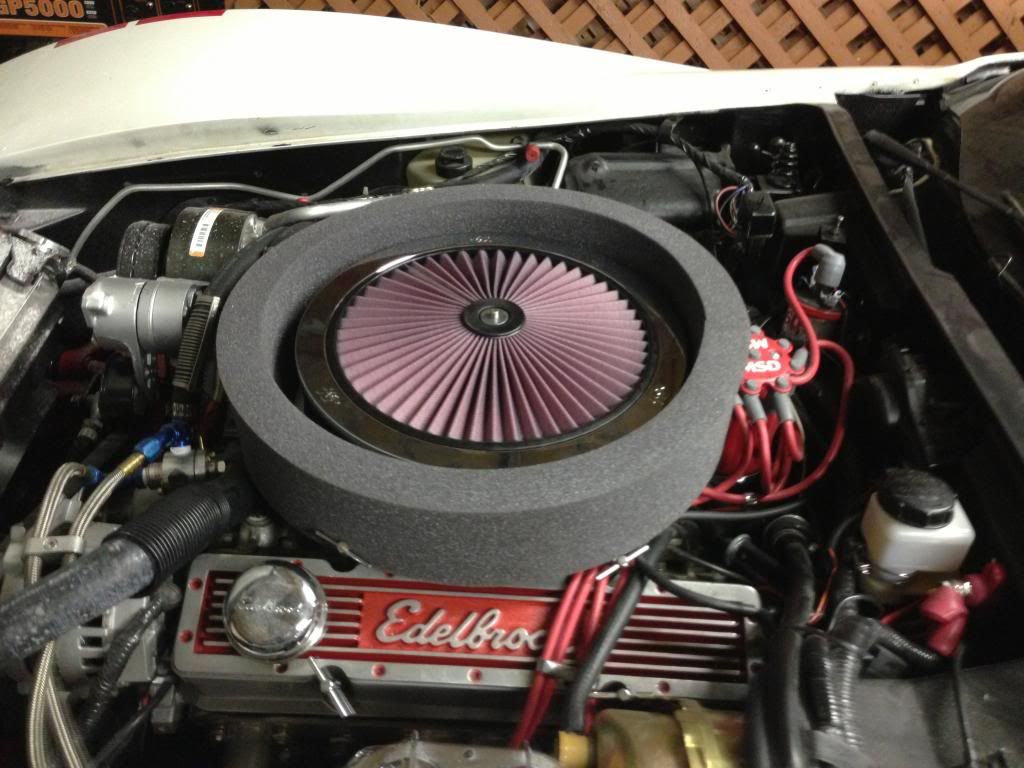
Next I modified my air cleaner base to create a pan that will seal my existing air cleaner assembly to the new cold air chamber.

This was my existing air cleaner assembly. The plan is to seal around it so it can still draw air in from the sides and also the XStream Air Flow Top.
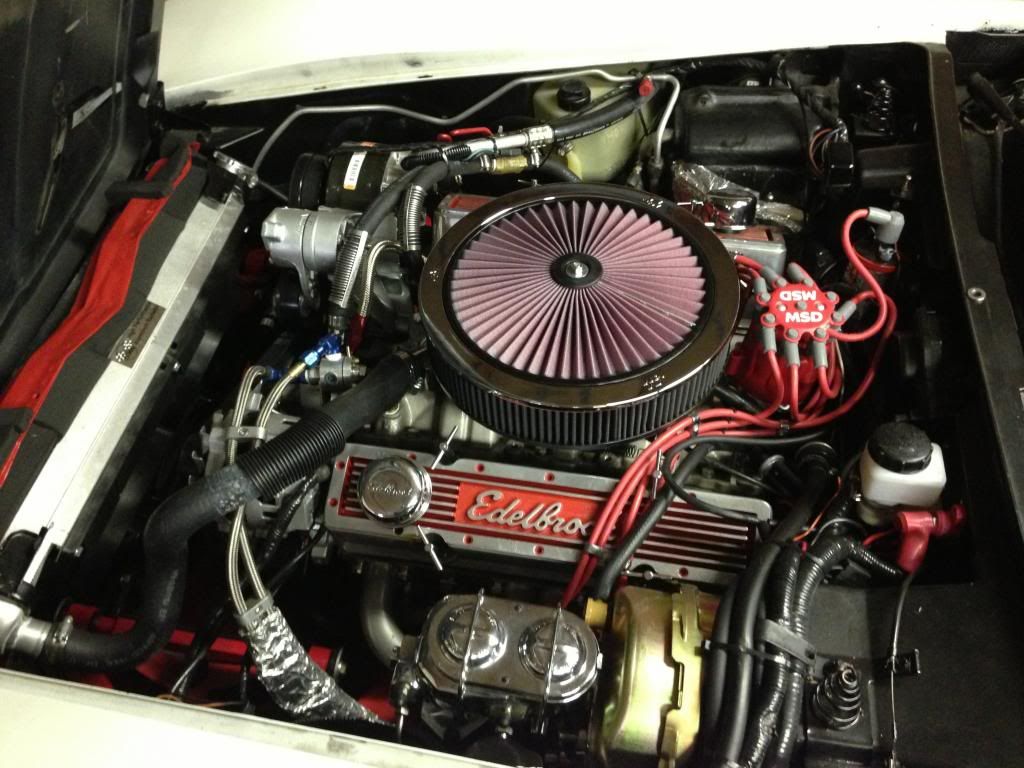


I ran into some clearance issues with the hood and had to take a hole saw and drill a couple areas to clear the ac line from the compressor, and serpentine tensioner. Also the upper rad hose hits, but I don't think its too bad since I have it rapped with a plastic shielding. 


Here's some pics of the air cleaner that I came up with to seal to the hood.


There is a 16 gauge aluminum "cake pan" 16" x 3" deep, that is cut in the center and the air cleaner base is attached/ sealed to. The sides of the pan are cut/ tapered front to back for hood clearance as that is the way the hood is angled when closed. The foam is Moroso flame resistant hood seal foam designed to seal the air cleaner to the hood and is 1.5" x 4". The foam seal is cut and fit over the side walls of the pan except for the top that seals against the hood. Cost was $20 for the cake pan and $20 for the Moroso foam seal. I used my existing base plate and K&N air filter, so $40 total.


Cut the opening for the air cleaner.


Here's a picture of the opening. I placed a pen in the opening to try to give a reference of the opening size, which I think should be large enough for good airflow.
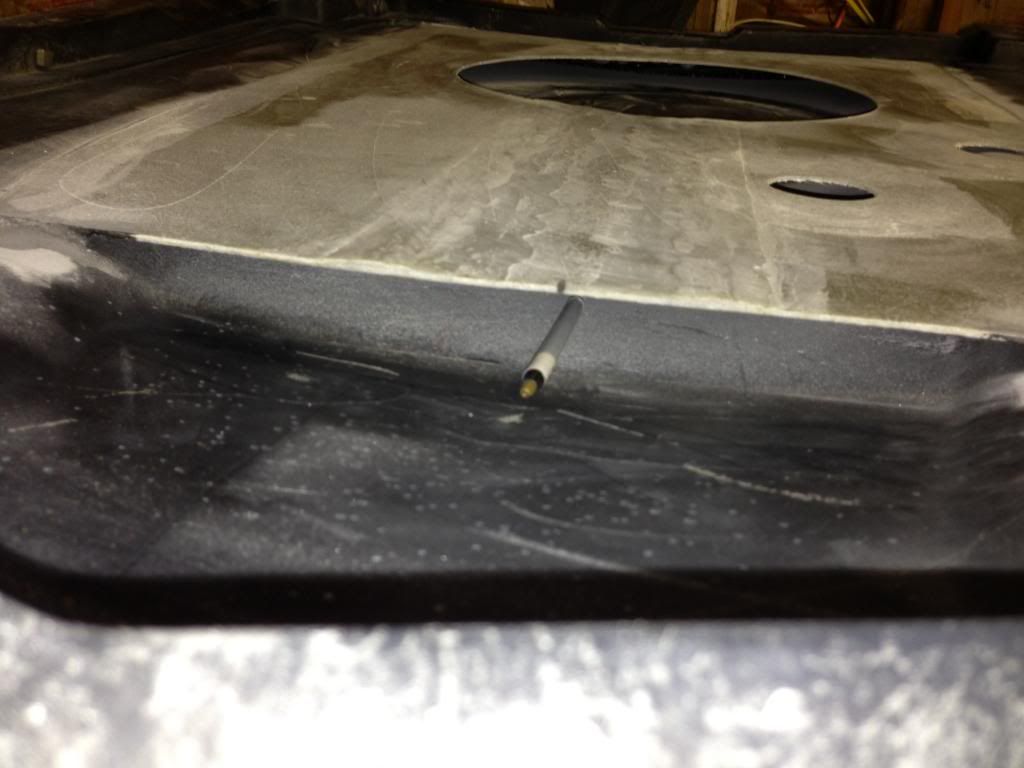


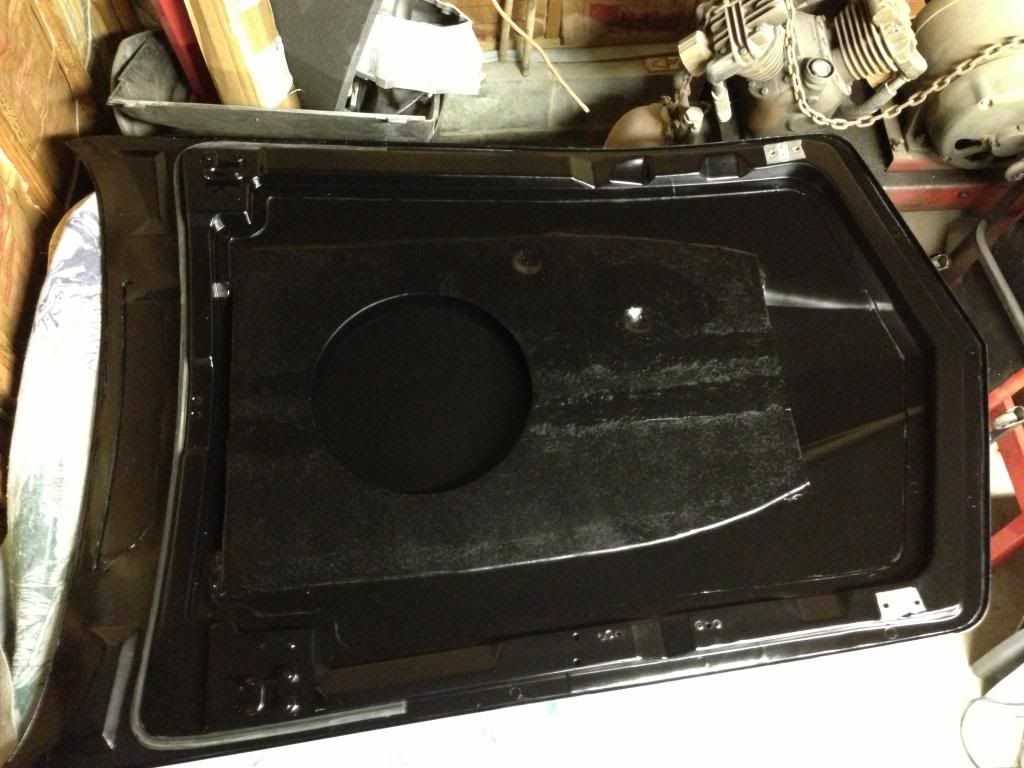
I did 3 layers of glass mat to seal the clearance holes, a little sanding, satin black paint, and put the hood back on.


Here's a few picks of the hood.


Got it together and went out for a quick test drive. It sure didn't feel like it was choking for air. I pulled out of a side street easy up to about 20-25 then nailed the throttle and the vette broke the tires loose, kicked out a bit and then took off like a bat out of hell up to 85-90 then I let off.


I added some thermal insulation under the hood to help keep engine heat out of the air chamber.


I bought thermometers to get some results with video.


Here's a picture of the temperature sensors for the engine bay and inside the air chamber near the filter top.


Here's a picture of the thermometers just above my Autometer digital speedometer/ tachometer combo. The thermometer on the left measures engine bay temp and the one on the right measures the air temp going into the air cleaner.
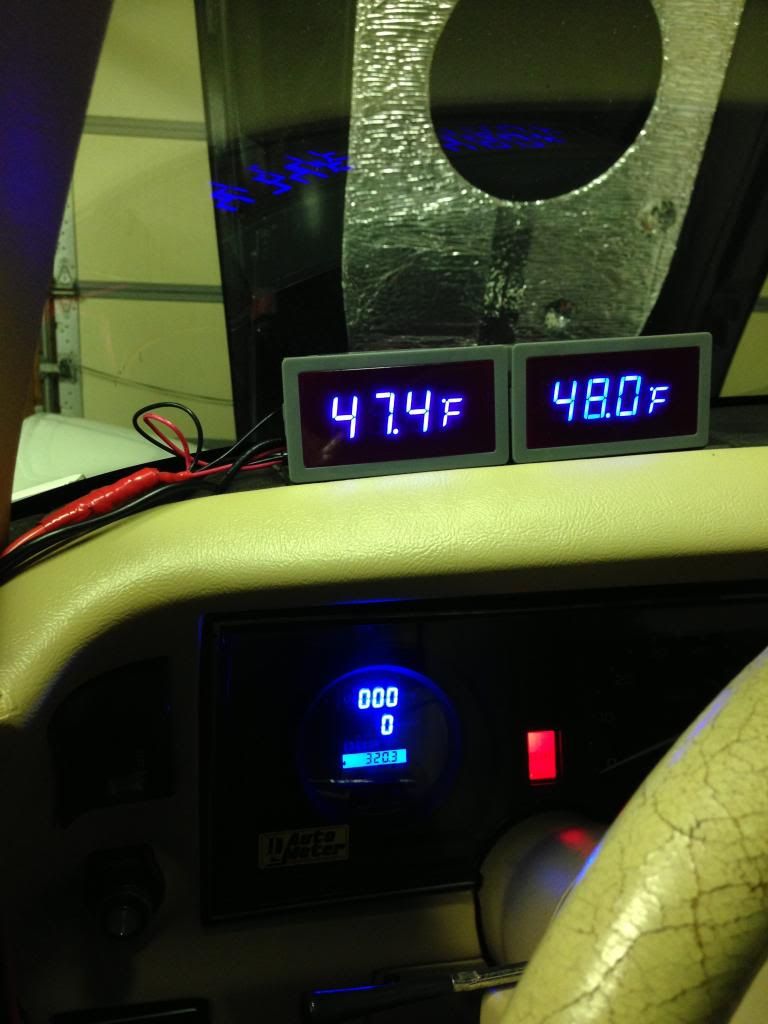


I took the vette out for a cruise and got some video with my GoPro. It's a little long but you can see the air coming into the engine stays very cool! The outside air temp was mid to upper 50's during the cruise. The temp display on the left is for the engine bay, and the temp display on the right is for the air going into the air cleaner. When I started the video, I had already driven it a couple miles, parked it for about 10 minutes and the temperature in the air chamber only went up about 10 degrees to 66 degrees, while the engine bay temp rose to 144 degrees. The whole time it stayed 55-57 degrees coming into the air cleaner.

http://youtu.be/MeoMFocEvm8

One thing I noticed in my video was every time I got on the throttle, the temperature in the engine bay increased and the temperature in the cold air intake decreased immediately. So, before my mod, whenever I got on it my engine would take in increasingly hotter air into the intake.

Since completing this modification, I added an aluminum 1" spacer between the carb and intake to increase the velocity of the air fuel mix, trim the pan a little, and still need to add a new seal to it. I'll take care of it before the warm weather.
2017 Fusion Sport - 401A/ Moonroof/ Magnetic Grey/ Livernois Motorsports 93 Stage 3

2015 Explorer Sport  - SOLD

Modded 1980 Corvette https://www.youtube.com/watch?v=4SUDndpy8bw

SHOdded

10 degree drop in IAT, nothing to sneeze at!  Good work :thumb:
2007 Ford Edge SEL, Powerstop F/R Brake Kit, TXT LED 6000K Lo & Hi Beams, W16W LED Reverse Bulbs, 3BSpec 2.5w Map Lights, 5W Cree rear dome lights, 5W Cree cargo light, DTBL LED Taillights

If tuned:  Take note of the strategy code as you return to stock (including 3 bar MAP to 2 bar MAP) -> take car in & get it serviced -> check strategy code when you get car back -> have tuner update your tune if the strategy code has changed -> reload tune -> ENJOY!

BlackJac

#20
Quote from: SHOdded on February 02, 2015, 09:23:19 AM
10 degree drop in IAT, nothing to sneeze at!  Good work :thumb:

Thanks. Average was 40-50 degree drop during normal driving.
2017 Fusion Sport - 401A/ Moonroof/ Magnetic Grey/ Livernois Motorsports 93 Stage 3

2015 Explorer Sport  - SOLD

Modded 1980 Corvette https://www.youtube.com/watch?v=4SUDndpy8bw

BlackJac

One of the next mods on the list is to convert the headlights from vacuum to electric operated (McSpeed's Killer Lights conversion), since my engine/ cam setup produces little vacuum, the lights do not move too well. I already have all the parts, so it's just a matter of when I get to it.

I added an electric vacuum pump for the brake booster, until I get to converting it to a hydroboost setup.

Here's a few recent pictures of my vette.


2017 Fusion Sport - 401A/ Moonroof/ Magnetic Grey/ Livernois Motorsports 93 Stage 3

2015 Explorer Sport  - SOLD

Modded 1980 Corvette https://www.youtube.com/watch?v=4SUDndpy8bw

BlackJac

#22
Here's a build sheet that I put together for my vette. Not to mention all the small odds and ends stuff I didn't include. lol

Engine:
350 4 bolt main
Block .040 over to 385 Stroker
Balanced rotating assembly
Clevite bearings throughout
Scat nodular crank 3.75" stroke
Pioneer race balancer
AMS Racing H-beam rods good for 650hp (identical to Eagle rods)
Keith Black Hypereutectic pistons 10.25.1 compression with the 64cc heads
World Products iron 64cc heads 2.02 intake 1.60 exhaust valves 200cc intake runners
Summit Racing hardened pushrods
Crane Gold Series aluminum rockers 1.52 ratio
Lunati Bracket Master II hydraulic cam, 300 degree advertised duration, 246 degrees at .050 lift, 108 degree lobe separation, .515 lift intake/exhaust
Summit Racing double roller timing chain
Edelbrock Torker II intake manifold
Barry Grant Speed Demon 750 Carb. Mechanical secondaries
Edelbrock Aluminum 1" carb spacer
MSD 6AL Ignition Control
MSD Blaster Coil
MSD Pro Billet Distributor
MSD Red Super Conductor 8.5mm Wires
MSD Dynaforce Starter
ACDelco Professional Platinum Spark Plugs
14" K & N Air Filter & Xtreme filter top
Custom Cold Air Induction with Temperature gauge
Engine Bay Temperature gauge
Edelbrock Victor Jr. reverse flow water pump (serpentine conversion)
March Underdrive Pulley Kit
160-Degree Thermostat
Dewitt's Aluminum Radiator with dual Spal fans
Hooker 1 7/8" Primary to 4" tube Sidepipes
Hooker Max Flow Inserts
20/50 Racing Oil

Transmission:
LT1 T56 6 Speed
Wilwood Hydraulic Clutch Master
Stainless Steel Braided Clutch Line
Fidanza Aluminum Flywheel - neutral balanced
Centerforce II Dual Friction Clutch
Custom Hydraulic Throwout Bearing
Hurst Billet Pro Shifter

Rear Differential:
Ikerd's Complete Rebuilt Dana 44 Aluminum
Poly Mounts
370 ratio
Spicer Solid U-Joints (driveshaft & halfshafts)
Van Steel Machined U-Joint Caps (driveshaft & halfshafts)
Van Steel Halfshafts

Wheels/ Tires:
17x9.5 C6 Z06 Style Wheels F / R Black Powdercoat with Red Band
2.5" Wheel Adapters F/ R
Nitto NT555 Extreme 275/ 40 ZR 17
New Lug Nuts

Suspension/ Chassis:
Went over all welds
Added Gussets for Lower Control Arm mounting brackets
Boxed front frame at Swaybar mounting location
Acid dipped and Powdercoated Frame Red
Coated inside of frame with Fluid Film
VBP Performance Plus Suspension Powdercoated Red
VBP Spreader Bar
VBP Offset Trailing Arms Powdercoated Red with rebuilt Hubs
Poly Bushing / Mounts used throughout
New Wheel Bearings/ Races all around
New Steering Valve, Cylinder, and Lines
Flaming River Stainless Steel Steering Coupler

Brakes:
Stainless Steel hard lines and mounting clips
Stainless Steel Braided Caliper Lines
VBP Stock Style Stainless Steel Piston O-Ring Calipers
Stainless Steel E-Brake Components
New Stock Rotors
DOT 5 Brake Fluid
Chrome Master Cylinder
New Brake Booster

Interior:
Stock, re-dyed two-tone Doeskin/ Black color
ACC complete Cut-Pile Carpet Set – Black
Lightweight Thermal Insulation throughout
Autometer Cobalt Digital Speedometer/ Tachometer Combination
Digital Temperature sensors for Engine Bay and Cold Air Induction
Dual electric fan manual switch with LED monitor Light

Electrical:
Upgraded Wire Gauge from Battery + / - to Engine Comp. / Alternator
Replaced fusible link at the battery with a 50 amp breaker
Added Positive & Negative Terminal Blocks to the Engine Compartment
Optima Red Top Battery
CS 133 Alternator

Fuel:
New Fuel Tank
New Fuel Lines 3/8" Steel Feed
New Fuel Lines 5/16" Steel Return
Stainless Steel Aeroquip
Goodyear High Pressure Rubber Fuel Line (to tank)
-AN 6 Fittings
Jeg's Inline Electric Fuel Pump
Fuel Pressure Regulator
Fuel Pressure Gauge
Jeg's –AN 6 In-Line Pre & Post High Flow Polished Fuel Filters

Accessories:
Serpentine Belt Conversion using 1989 Firebird Accessories (except AC)
1987 Corvette AC Compressor
New AC Line, seals, Dryer, and Orifice Tube
Thermo Insulated AC Box
1989 Firebird Power Steering Pump

Mics:
New Windshield
New Melrose Galaxy Glass T-Tops
New Weatherstrips
Installed/ welded Rocker Channel Inserts
Birdcage cleaned and painted with POR-15
Cleaned and painted, or replace all brackets, screws, bolts, and springs throughout
Painted Underbody Satin Black
All Chassis Parts Powdercoated or Painted

A huge thanks to my Brother and Father for giving me a hand with this build, and my Wife for putting up with it! lol
2017 Fusion Sport - 401A/ Moonroof/ Magnetic Grey/ Livernois Motorsports 93 Stage 3

2015 Explorer Sport  - SOLD

Modded 1980 Corvette https://www.youtube.com/watch?v=4SUDndpy8bw

SHOdded

Is that all?  I thought there'd be MORE :D  Holy moly!
2007 Ford Edge SEL, Powerstop F/R Brake Kit, TXT LED 6000K Lo & Hi Beams, W16W LED Reverse Bulbs, 3BSpec 2.5w Map Lights, 5W Cree rear dome lights, 5W Cree cargo light, DTBL LED Taillights

If tuned:  Take note of the strategy code as you return to stock (including 3 bar MAP to 2 bar MAP) -> take car in & get it serviced -> check strategy code when you get car back -> have tuner update your tune if the strategy code has changed -> reload tune -> ENJOY!

SHOnUup

Wowza!!!

That's one mighty list. No stone was left unturned. :-X

Rich

2011 Sterling Gray Metallic SHO non PP,
12.4211 @ 110.28 Livernois 3bar tune & CAI,
Added since...PPE catless Dpipes, Megan coilovers, Powergrid adjustable end links, and EBC slotted rotors and red stuff pads.
Tommy Designs grille with carbon fiber hydrographics, fender badges and fog bezels hydrodipped also, tinted windows, head & taillights, debadged trunk with all chrome plasti-dipped, black calipers, obdlink mx scantool running torque pro on 7" tablet.

BlackJac

Not done yet...lol

One of these days I plan on stripping it down to the fiberglass and finishing the body & paint. I haven't decided on what color scheme I'll be going with.

Here's a picture of a 86' Monte Carlo SS that I stripped down to the metal and painted using black Glasurit many years ago.

2017 Fusion Sport - 401A/ Moonroof/ Magnetic Grey/ Livernois Motorsports 93 Stage 3

2015 Explorer Sport  - SOLD

Modded 1980 Corvette https://www.youtube.com/watch?v=4SUDndpy8bw