• Welcome to Ecoboost Performance Forum. Please log in or sign up.
collapse

Rx Catch Can Install on Explorer Sport

Started by JimiJak, April 06, 2014, 09:49:25 AM

Previous topic - Next topic

JimiJak

UPDATES AND CHANGES HAVE BEEN ADDED TO THIS INSTALL / HOW-TO AND ARE LOCATED WITHIN THIS THREAD. DO NOT COMPLETE INSTALL WITHOUT REVIEWING THE CHANGES:
- UPDATED CSS INFO WITH FIRST DRAIN VIDEO - POST #13
- CHANGE IN PROPERLY VENTING CSS - POST #16
- CHANGE IN GENERAL MOUNTING / INSTALLATION - POST #32


Alright, it looks like I'm the guinea pig on this one for the XSport (Hence the above changes). Tracy @Tuner Boost did a nice write up on the Flex, and the XSport is almost identical. I just found a couple of places to be a bit confusing, so I thought I would do my own. This is loooong...a little wordy...and with waaay too many pictures...but we're all visual learners. ;)

After install with this particular mounting, the engine cover no longer fits on, it hits on the catch can with this particular mounting of it. Although, if you plan on removing your engine cover (like most of us have already (since who wants to look at a piece of plastic when they open their hood?)), this won't matter. anyway.

If you want more information on what this does, or why you need one (and you do!) see ---> THIS

SO...let's get started!
From the front of the engine bay - Pre-Install (front bumper side):


First, remove the PCV line that runs from the passenger's side of the rear valve cover to the vacuum barb on the intake manifold.


Here's a pic of what this line should look like removed. Also, leading into the next step; you will want to roll the foam hose covering back to get to the hard plastic line underneath. To remove these fittings from the barbs, just push the little plastic looking switch on the fitting to the left, this loosens up the fitting and it comes right off.


With this tube removed: carefully slice the hard plastic tube deep enough to split it off of the fitting barbs.
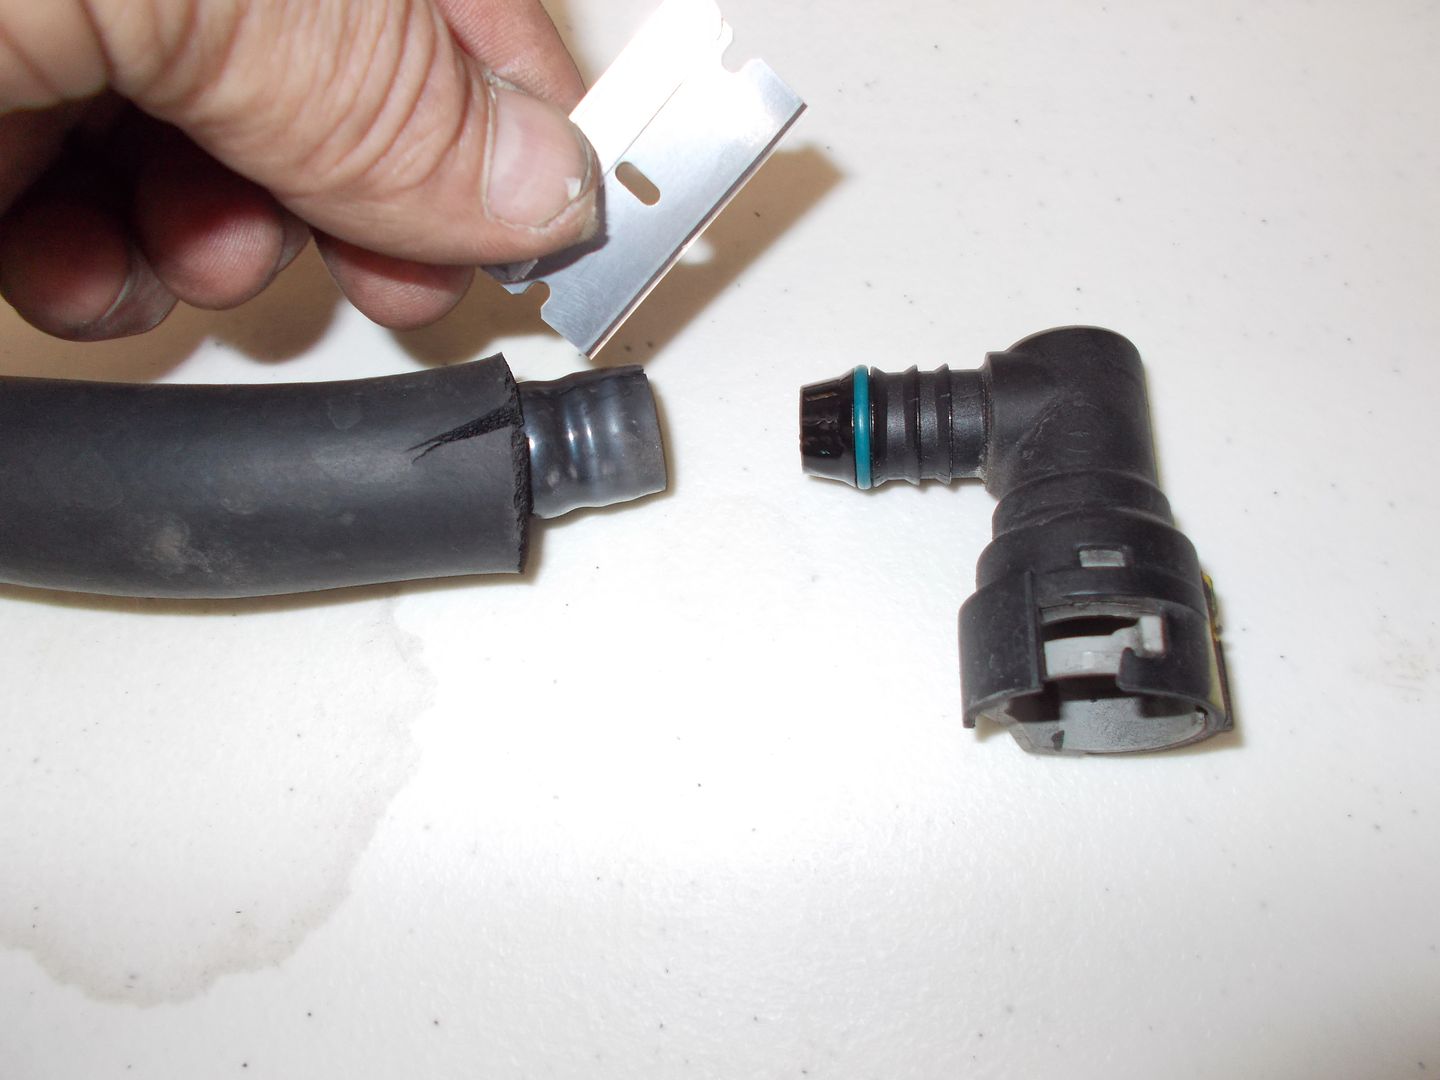

You can now reassemble the fittings.
The kit comes with x3 short lengths of 5/8" hose. Each one of these pieces of hose will end up attached to a 90* fitting on one end, and a barbed reducer on the other end as seen here.
When finished with the first fitting you can reattach it to the PCV fitting on the rear valve cover.


You can then rebuild fitting number 2 and attach it back to the vacuum barb on the intake manifold, where it was removed from.


Original PCV line, now replaced by rebuilt-original fittings


Next, locate the front side PCV line; 3 O'Clock from the oil fill cap.


Remove said fitting


Replace the fitting by placing the rubber cap included with the kit onto the fitting barb.


Follow the front PCV line to the driver's side of the engine, near the air box; remove this fitting.
This fitting will be the third fitting to rebuild with a reducer.


On a side note; at this point I'm sure it's been hard to miss the amount of oil inside the pcv lines as you pull them off. I even had a considerable showing being that I only have 1,600 miles at this point. Granted, I imagine you'll have more blow-by during break-in than is typical in the following miles; but still not what you want to see. Buuuut that's why you get a catch can! ;)


After you rebuild the fitting, re-attach it to the barb.


This is where the front PCV line was, and where you will be attaching a piece of hose after you cut to length.


Next, locate the mounting plate Ford was kind enough to leave wide open for us. It's located on the passenger's side of the engine bay, 6 O'Clock the oil cap, above the radiator, just under the coolant information sticker.


Now you'll need to assemble the can return lines and mounting bracket.
This is how it comes in the box


These are the return lines; this is how them arrived - with the check valves already installed.


They screw onto the fittings on the top of the can, but prior to doing that, I found it better for my application to turn the supply (middle) line 180*. To do this, you have to unscrew one of the bungs, then screw it back into place and attach the return lines.


This is basically the set up I chose for mounting. I found it was best to keep the can as high up as possible so I used the two lower holes on the can.
I ended up with a quick run to the hardware store to get 1/4" x 1" bolt with nut, washers, and a lock washer, to attach the swivel to the bracket. I got a second one for mounting the swivel bracket to the mounting tab on the explorer also.


Side view of the bracket


Catch can and clean side separator installed. The return lines will be reversed for final install.


Cut a section of hose to attach the clean side separator to the drivers side-rebuilt fitting on the intake pipe.


Cut lengths of hose to attach the rear valve cover pcv fitting to the center of the catch can. This is the inlet to the can, so there is no check-valve. One of the can outlets (the ones with the check valves) attaches to the vacuum barb on the intake manifold.
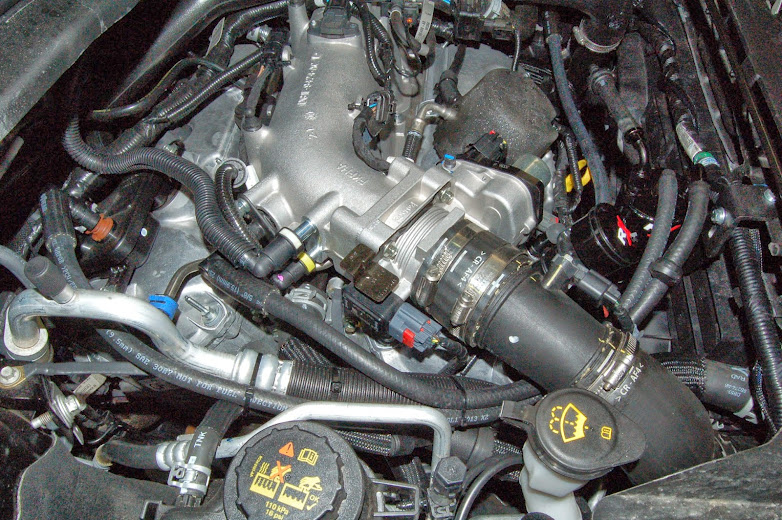

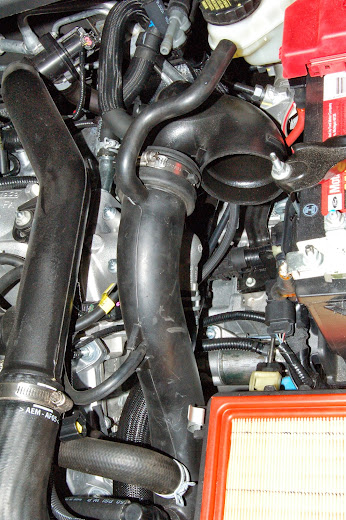
Next is drilling the intake pipes (front and rear). First step here is removing the airbox and loosening the Y-pipe fittings.

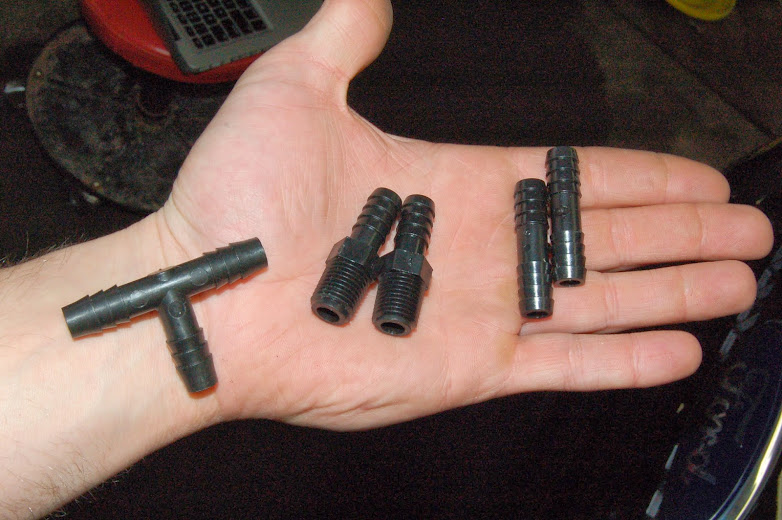
The kit comes with a T-fitting that you will use on the front pipe, and two different types of barb fittings; two butt connectors (right) or two threaded barb fittings (middle).
I chose to use the threaded fittings which requires the pipes to be tapped.
If you want to use the butt connector you can click HERE to refer to the Flex instructions.

Start by drilling a 1/4" pilot hole in the intake pipe between the small upper vacuum line and the electronic blow off valve return hose. Then broaden the hole by drilling a 27/64" hole and tap it with a 1/4" pipe thread tap.
Since I was drilling a larger hole than what would be necessary for the smaller barb fittings, I wasn't comfortable with the shavings falling down into the intake. So I split the intake at the Y pipe and inserted a flexible shop vac hose to the area I was working in


Repeat the previous steps for the rear intake pipe. For this you will have to find a place after the intake Y where the pipe is easily accessible.


This hole size / tap combo make for a pretty tight fit. I didn't feel the need to use any pipe dope tape or RTV since it's so snug. You only need to go in about half the threads on the fitting. This seats securely, without making too much of an obstruction inside the pipes. The threaded fittings have tapered threads; the deeper you thread them, the tighter they get


I used a small drop of oil on the barbs to slide the hose on, so you're not pushing too hard against the fresh threads on the intake pipes


You'll need to cut another section of hose to go on the front threaded fitting. The shorter you can cut this hose the better, but remember you will have to leave enough room for a barbed fitting to enter the hose from either end. Install the T into the top.


Now you can run your final lengths of hose. I started with the firewall side fitting. After attaching to the fitting, I zip tied it to the intercooler pipe to take the pressure off the fitting from the tight bend. Then ran it in between the two pipes to the T fitting.


A second length of hose then gets installed from the T, around the radiator (front) side of the large intercooler hose, and zip tied it to the electrical bundle that runs along the top of the radiator; back to the second outlet hose (with check valve) on the top of the catch can


Reconnect your intake pipes and replace your air box cover.
Congratulations; You're done! You have successfully installed your new Rx Catch Can and clean side separator. Enjoy your new found intercooler longevity and un-coked intake valves!


THANKS FOR READING!

*edit: INSTALL AT 1,700mi.
"America is all about speed. Hot, nasty, badass speed." - Eleanor Roosevelt

2014 XSport Black Betty Build

glock-coma

Great write-up and pics. Thank you for the how to.

2010 RCM non PP
K&N panel filter
sp534 @ 30
unleashed 93 performance+firm shift+boost
more to come.....

2010 red candy metallic non PP 402B
AJPTURBO 2 BAR Tune Stock 14.1@100.3 / Tuned 12.83@107.7
K&N panel, RX OCC, Sp-534 @.30 Tint 50%F-35%R BOV bypass
1997 SHO silver frost (sold)
1990 SHO triple black 5-speed (saved my life)

SHOdded

Seconded on the writeup, nicely done!  Any chance of getting some ginormous versions of these pics?
2007 Ford Edge SEL, Powerstop F/R Brake Kit, TXT LED 6000K Lo & Hi Beams, W16W LED Reverse Bulbs, 3BSpec 2.5w Map Lights, 5W Cree rear dome lights, 5W Cree cargo light, DTBL LED Taillights

If tuned:  Take note of the strategy code as you return to stock (including 3 bar MAP to 2 bar MAP) -> take car in & get it serviced -> check strategy code when you get car back -> have tuner update your tune if the strategy code has changed -> reload tune -> ENJOY!

JimiJak

Quote from: SHOdded on April 06, 2014, 10:05:56 AM
Seconded on the writeup, nicely done!  Any chance of getting some ginormous versions of these pics?

Thanks!

as for the ginormous pics: If you right click on any of the pics and select "COPY IMAGE URL", then paste the URL into your address bar, you should be able to see the 'ginormous' versions of any of the pics.
"America is all about speed. Hot, nasty, badass speed." - Eleanor Roosevelt

2014 XSport Black Betty Build

bigmoneycloser

Dumb question.
Do they make metal versions of all the plastic fittings used? Like the "T" and connector fittings?


Sent from my iPhone using Tapatalk
2014 Explorer Sport 401A
22x10.5 Vossen CVT- powder coated Matte Graphite
Pirelli Scorpion Zero Asimmetrico 285/35/22
H & R lowering springs/LMS 93 high boost/AirAid CAI/170* thermostat/3 Bar Map Sensor/Full LED interior /HID head and fog lights/weather tech digital floor mats/SharkFin antena/custom Billet foot pedals/Wilwood big brake kit/ LMS-Corsa CatBack Exhaust/LMS Catted Downpipes

JimiJak

Quote from: SHOdded on April 06, 2014, 10:05:56 AM
Seconded on the writeup, nicely done!  Any chance of getting some ginormous versions of these pics?
On second thought; I went through and re-wrote the coding for the pics. They should be good to go now as far as clicking on them to make them bigger, then clicking the expand arrows to get them larger yet. Let me know if this didn't work.

Quote from: bigmoneycloser on April 06, 2014, 10:30:29 AM
Dumb question.
Do they make metal versions of all the plastic fittings used? Like the "T" and connector fittings?

I'm sure it's a home depot type thing. I know the threaded fittings are available in brass, but I can't say I've specifically seen a T-Connector. Although a Y-Connector would probably work better if you find one.
"America is all about speed. Hot, nasty, badass speed." - Eleanor Roosevelt

2014 XSport Black Betty Build

QuickSilver

Seems like so long ago when I ordered mine that when a giant box showed up yesterday, I didn't remember what I had ordered ;D  Great write up, I'm just gonna follow your write up step by step this afternoon, that way *if* a few beers get emptied during the install, I wont have to sweat the details like you did :beer2: A big thanks for a great write up and also to your camera person as well!  I see both of your hands in some of those shots ;)
AJ

2014 Ingot Silver Explorer Sport- LMS V3 Tune, AirRaid CAI, Hi_flow Catted DP's to Complete dual 2.5" exhaust, 19"X 9.5"TSW Panorama Rotary Forged/powdercoated Rims, Cree LED Foglights, Hoping for those Megan coilovers to be developed...

BiGMaC

#7
Quote from: bigmoneycloser on April 06, 2014, 10:30:29 AM
Dumb question.
Do they make metal versions of all the plastic fittings used? Like the "T" and connector fittings?

Yes... AN fittings (SS or Black) to use on your braided hose

There is also a plastic black shrouded hose clamp that looks like a metal AN fitting... cost is about 1/5th of AN.
here's a pic of one... left click to enlarge:


I have also considered buying black loom to cover the standard hose... about 1/3 the cost of braided hose with good appearance

•2013 Taurus SHO nonPP - All Ford factory options, 3BAR MAP, LMS v8 tune (mods for 3BAR, DPs, and T-stat), Paint & plastic correction, CQuart finest all exterior surfaces, limo black window tint,VLED Triton switchbacks, Daytime BrightLites switchback DRLs, full interior and exterior LED conversion, Lamin-X charcoal blackout tail lights and reflectors, PPE catted and coated downpipes, EBPP coated hotpipes with BoVs VTA, MDesign CAI
•2013 F250 CC Lariat 6.7EB Diesel -stock

JimiJak

Quote from: QuickSilver on April 06, 2014, 11:31:17 AM
...I'm just gonna follow your write up step by step this afternoon, that way *if* a few beers get emptied during the install, I wont have to sweat the details like you did :beer2:

How'd the install go??

Quote from: BiGMaC on April 06, 2014, 01:40:37 PM
Quote from: bigmoneycloser on April 06, 2014, 10:30:29 AM
Do they make metal versions of all the plastic fittings used? Like the "T" and connector fittings?
Yes... AN fittings (SS or Black) to use on your braided hose
There is also a plastic black shrouded hose clamp that looks like a metal AN fitting... cost is about 1/5th of AN.
I have also considered buying black loom to cover the standard hose... about 1/3 the cost of braided hose with good appearance

Found some of these hose clamp AN-style covers; made by Spectre Magna (/Spectre Perf.), Fragola Perf., Earl's Perf., Billet Specialties, Russell Perf., etc. all the usual places:  JEGS, SUMMIT, between $5 - $25/ea depending on materials and size, solid red, blue, black, white, red/blue, chrome.

Mostly all the same brands and stores for the braided hose sleeve (add autozone to the list). Depending on how you find it, roughly $1/ft. for colors and $2/ft. for "steel".
"America is all about speed. Hot, nasty, badass speed." - Eleanor Roosevelt

2014 XSport Black Betty Build

EcoPowerParts

Looks great, great write up! Exactly what this community is about!
Mike B | info@ecopowerparts.com
www.ecopowerparts.com -
please use my website for any price quotes and to submit any orders.
Please email me via info@ecopowerparts.com if you have any questions on new or existing orders, PM's via the forum are hard to track your purchase as I can't relate user name to actual name.
https://www.facebook.com/ecopowerparts

bpd1151

Nice write up indeed!

Reminds me of all my own "How-To"s" I've posted here. :ok:

Nicely done, now enjoy those well deserved beers! :beer:

Sent from my DROID RAZR HD using Tapatalk


Ryan327

I'm really thinking about ordering this for my sport but waiting to see what comes out of yours and the other early adopters first! 

Thanks for taking the time to put together the write up!
2013 Ford Explorer Sport - Lund Racing 93 Tune
2010 Audi A4 - APR Stage 1 Tune
2003 Pontiac Grand Prix - Too much to list but still slow!

JimiJak

New install info from TunerBoost:

Quote from: Tuner Boost on April 12, 2014, 04:28:18 PM
...Yes, the drill/tap spot on the front charge pipe was upstream of the barb for the cleanside and was over powering the flow when cruising and in boost. So we moved the cleanside separator line and fitting to as close to the air filter as possible and cured it. This also allows no drilling for the front tube!!!  Just use the existing OEM barb the cleanside tube did attache to. I also recommend cleaning the CAC (remove to do) first as he still has a good bit in his CAC.

Quote from: Tuner Boost on April 12, 2014, 01:05:33 PM
...What we found is the drill location for the front intake tube is before the fresh side barb, so at cruise it has been over powering the flow not allowing the can to work properly. So, everyone please note, no need to drill the front inlet pipe. Simply use the 5/8" barb to T into the back side one and then use a 90* 1/4 NPT x 3/8" barb for your clean side hose connection and drill it just after (down from) the air filter/air box. and connect the cleanside separator there. We tested and it worked properly, and it makes install easier. The trucks we can reach to drill downstream so that has never been an issue. Whichever fitting is closest to the turbo will over power the one up stream even if only by a few inches.  So, he is checking back in 500-800 miles to see the accumulation at that time.  Any questions, or anyone needing a fitting let us know and we will get it right out.

You want the fitting installed for the cleanside separator as close to the air filter as possible.
"America is all about speed. Hot, nasty, badass speed." - Eleanor Roosevelt

2014 XSport Black Betty Build

JimiJak

#13
First drain complete!

Test Information / Tech Specs:
- Testing Phase – From 1,700 – 2,200 miles (500 miles of accumulation)
- Clean Side Separator – Attached to original mounting instructions location: from CSS to vacuum barb closest to the turbo. This was the same location as PainterPatt's install that netted him nothing caught in the can. The CSS line has now been re-routed (see pics) to the airbox, and the barb has been capped.
- Type of break-in performed when new: From 22mi to 1,500 mi the truck was driven as Tracy explains in his original PCV article to properly seat the rings. Allowed to warm up completely, then driven hard; full revs up AND back down to provide the proper side-wall pressure in the cylinders, resulting in increased ring friction.
- Type of Oil used for break-in: Hindsight being 20/20, I ran the stock semi-synthetic it came with from the factory.
- Type of driving during test: For almost the entire 500 miles my girlfriend drove the truck, mostly to and from work, cruise control, and cautious / non-spirited driving. Mostly 55-75mph. I get manage to get a hold of it for about 20 minutes and we went for a cruise. After warm-up, I had one 0-120mph pull (closed-course of course! ;) ), putted around for cool down, then parked it.
- Oil level still showed as "full" today before doing the oil change that followed this video.
- Replaced oil with Motorcraft 5w-30 Synthetic-Blend with a Wix-Premium oil filter.

That's all I can think of for now...see you in 500 miles!!

OCC Drain Video
I would guess about 15ml of fluid.

"America is all about speed. Hot, nasty, badass speed." - Eleanor Roosevelt

2014 XSport Black Betty Build

BiGMaC

Great report JJ.... any estimate on the volume in the pop bottle?

•2013 Taurus SHO nonPP - All Ford factory options, 3BAR MAP, LMS v8 tune (mods for 3BAR, DPs, and T-stat), Paint & plastic correction, CQuart finest all exterior surfaces, limo black window tint,VLED Triton switchbacks, Daytime BrightLites switchback DRLs, full interior and exterior LED conversion, Lamin-X charcoal blackout tail lights and reflectors, PPE catted and coated downpipes, EBPP coated hotpipes with BoVs VTA, MDesign CAI
•2013 F250 CC Lariat 6.7EB Diesel -stock